How to Reduce Energy Bills This Winter Season with a Dirt Crawl Space Upgrade
Reduce your heating bill this winter (and all year round) by creating a more energy-efficient crawl space.
You can upgrade your dirt crawl space by following these steps. We've seen homeowners save 15-25%, depending on the size and other factors inside the home.
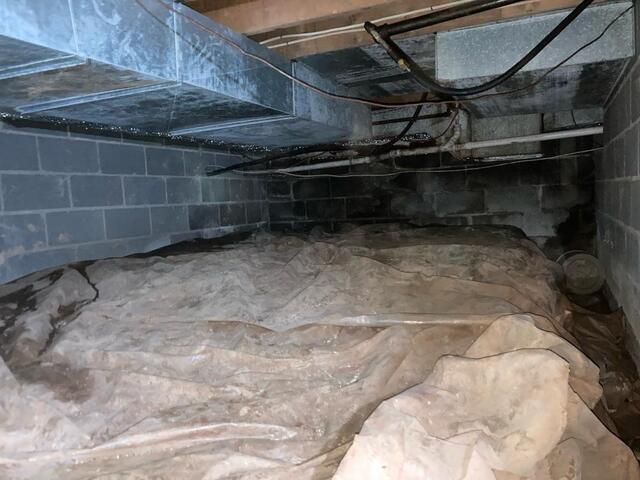
Let's look at the science behind dirt crawl spaces:
Air from the crawl space moves through your ductwork into your upper levels, bringing humidity with it. All that damp air requires more energy for your home to heat, directly impacting your utility bill.
Even a little air leaking into your home from the dirt crawl space can add up. A wet, humid crawl space isn't just costly; it can lead to mold growth, weaken your home's structural integrity, and attract pests.
Here's how you can reduce energy bills this winter by upgrading your crawl space:
-
Get rid of the moisture and humidity.
First things first, fix any water leaks. You won't be able to save a dime if you can't resolve the root issue. If you've noticed a water leak, seepage, or standing water after cold rain, sleet, or melting snow, do a careful inspection to find low spots where water may be collecting. Waterlines are a good indicator that you have a problem.
You'll want to install a reliable sump pump with an airtight lid, a cast-iron pump, and an alarm in case of pump failure or leak. Ideally, the crawl space will pitch down toward the sump pump. You'll also need a proper discharge line to move the water from the sump pump to the yard, where it'll flow downhill and away from the house.
-
Create a barrier between the crawl space and the earth.
The goal at this step is to completely cover and protect your crawl space from water vapor and pests with a crawl space encapsulation system. It's also where you convert an ugly, dirt space into a beautiful, clean one.
Isolating the crawl space from the ground helps prevent water vapor from flowing through the soil and into your walls. It also allows water to drain from the walls and floor to the sump location. The barrier should be durable enough to crawl on during maintenance and ideally treated with an antimicrobial agent to prevent mold growth.
-
Seal any holes and vents exposed to the outside world that allow in air, moisture, and humidity.
Vents leading to the outside of your dirt crawl space are bad! That's because they let in air and moisture, costing you more on energy every single month. Use vent covers resistant to rust and rot, and make sure they are airtight. Air leaks should be sealed, including gaps under sill plates, around pipes and wiring, poorly fitting or rotted hatch doors, and other openings that lead outside.
For access wells or crawl space entries below the ground outside, install a new door that is airtight, secure and lockable, and resistant to rust and corrosion.
Cracks and other sources of air leakages need to be sealed with caulk, flashing, spray foam, or other necessary materials.
-
Properly dehumidify the crawl space air.
Your standard 20, 35, or 50-pint dehumidifier probably isn't doing much to reduce moisture in your crawl space. You want one that can handle around 100 pints of water a day but utilizes the same amount of energy as one you'd buy online or a local home improvement store. This amount of power will eliminate any damp, musty smell and feeling you get in your crawl space or home.
A good dehumidifier won't require you to empty a bucket either. It will automatically flow into your drainage or sump system.
-
Call a crawl space repair and encapsulation expert for help.
If you really want to save up to 15-25% in energy bills this winter, a crawl space encapsulation and repair expert should do the work to cover all bases. Give Alford Foundation & Crawl Space Repair a call for an inspection, estimate, custom solution, and the best team of professionals the tri-state has to offer.